This guide serves as an introduction to Lua syntax, Client Control components, and Miliastra-specific Lua features.
This guide introduces topics in a linear fashion. You may miss important information if you skip ahead!
¶ Client Controls vs. Server Controls
Version 7.1 introduces multiple new UI components, including a new Server Control component called Client Control Container and 11 Client Control components.
Client Controls are a new type of UI object that can only exist in a Client Control Container Server Control component and are controlled by Lua scripts. All previously exisiting UI components are now classified as Server Controls to differentiate from the new Client Controls, as Server Controls and Node Graphs cannot directly manipulate Client Controls or Lua scripts, and vice versa.
| Client Control Component | Description |
|---|---|
| ContainerControl | An empty component which can be used to organize your Client Control hierarchy. |
| TextBoxControl | Client Control equivalent to the Text Box Server Control. |
| TextWindowControl | Client Control equivalent to the Text Window Floating Interaction Page Server Control. |
| ImageControl | Client Control equivalent to the Image Server Control. |
| UIAnimationControl | Client Control equivalent to the UI Animation Server Control |
| FullscreenUIAnimationControl | Client Control equivalent to the Fullscreen UI Animation Server Control. |
| PresetButton | Client Control equivalent to the Custom Button Server Control. |
| KeyHintControl | Displays a configurable button hint depending on the current input type (Keyboard & Mouse and Controller button hints supported). |
| CursorEventArea | An empty component which can receive cursor events within its bounding box. |
| GridScrollerControl | Creates and controls Client Controls organized in a grid formation, similar to how the Single Choice Window Floating Interaction Page Server Control operates. |
| ReferenceControl | A component that instantiates the referenced Client Control Template index as a child when instantiated. |
¶ Key Notes
- Node graphs are not able to directly manipulate Client Controls; likewise, Client Controls are not able to manipulate Server Controls.
- Client Control Templates can be created multiple times and instantiated at runtime.
- Client Control Templates behave like prefabs; all instances of Client Control objects are assigned a unique numerical ID when instantiated.
- Instead of using the template index to show/hide the template like you do with Server Control Templates, the Client Control Template index is used to create new instances of the specified Client Control at runtime.
- All Client Controls can be freely nested to create parent-child relationships.
¶ Lua Capabilities
As a brief introduction, this is a broad list of what you can and cannot do with Lua:
| With Lua you can... | With Lua you cannot... |
|---|---|
| Instantiate, modify, and delete Client Controls. | Add, remove, or change the visibility of Server Controls. |
| Receive mouse/touch, keyboard, and controller events. | Attach scripts to Client Controls at runtime. |
| Send and receive signals with parameters. | Change, apply, or activate entity components. (E.g., Motion Devices, Unit Statuses, Nameplates) |
| Get declared Custom Variables from the current Player, Character, or Stage Entity. | Modify Character or Entity parameters. (E.g., HP, skills, resistances) |
| Receive Custom Variable changed events from the current Player, Character, and Stage Entity. | Set Custom Variables on any entity. |
| Animate Client Controls. | - |
| Play client-side sound effects. | - |
| Concatenate strings. | - |
¶ Getting Set Up
You will need an external text editor to create and edit your Lua scripts. Any text editor will work; however, IDEs provide many features that improve your coding experience, such as syntax highlighting, autocomplete, and automatic formatting.
¶ Recommended IDEs
 VS Code - (Recommended and used in guide) A popular and customizable IDE.
- ZeroBrane - A lightweight IDE made for Lua.
- Notepad++ - A general purpose text editor with Lua support.
¶ IDE Setup
After installing your IDE, it is recommended to perform some extra setup to get the Miliastra Lua API defintions in your project.
¶ MiliLua API Definitions VS Code Extension
If you are using VS Code, it is strongly recommended that you install the MiliLua API Definitions extension for API documentation, defintions, and intellisense for Miliastra-specific functions, types, and enums.
Another extension called Lua by sumneko, which is required, will also automatically be installed.
¶ Using the Extension
Once installed, this prompt should appear at the bottom-right corner of VS Code the first time you open a .lua file in any workspace:
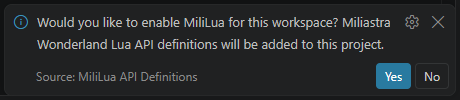
Select "Yes" to get support for Miliastra-specific Lua features.
¶ Adding Miliastra API Definitions to other IDEs
If you are not using VS Code, you can search for instructions on how to add custom Lua definitions to your IDE of choice.
The Lua definition files can be found at this GitHub repo.
¶ Locate your project's external_lua_file folder
- In the Miliastra Sandbox, navigate to
Window > Client Script Resource Explorer.
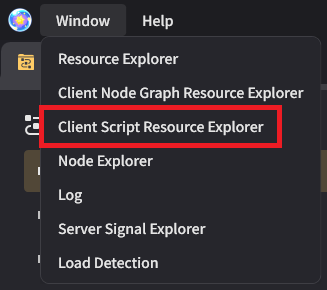
- Open the
Uncategorized Tab, right click to show the context menu, and selectNew Client Scriptto open a File Explorer window.
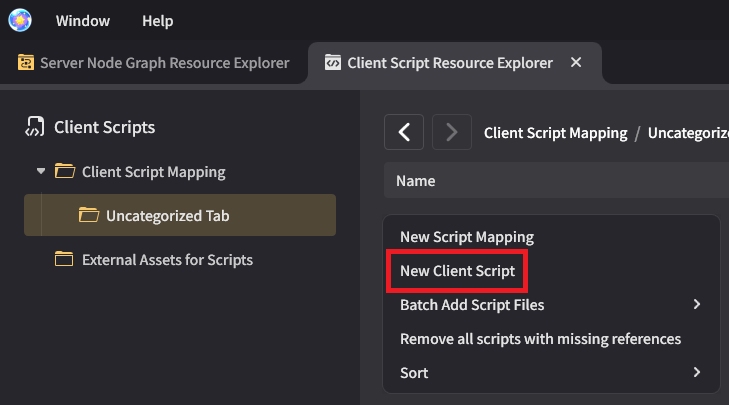
- Select and copy the full path from the File Explorer address bar. Close the File Explorer window.

The full path should look something like this:
C:\Users\<YOUR_USER>\AppData\LocalLow\miHoYo\Genshin Impact\BeyondLocal\<YOUR_UID>\Beyond_Local_Save_Level\<YOUR_SAVE_ID>\external_lua_file - Open your IDE and find the option to open a folder.
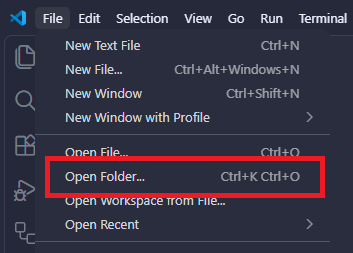
- Paste the copied file path from Step 3 and confirm.

¶ Lua Guide
If you are unfamiliar with programming or struggling to learn Lua's syntax, you may need to find other resources to teach you; however, if you are confident creating Node Graphs, you likely know enough to follow along comfortably!
It's strongly recommended to read (or skim) through each section below, but don't feel pressured to try and memorize everything; you can always come back to reference anything you're confused about or ask for help in the Genshin Impact Creator Front Discord server!
¶ Lua Basics
The "Miliastra-like" examples are provided to help illustrate similarities and create connections to exisiting knowledge; however, they should not be taken literally.
¶ Identifiers[1]
Identifiers are used to define variables, functions, and fields. Identifiers can start with characters A-Z, a-z, and _ followed by any number of letters, numbers, or underscores. The following example shows several valid identifiers.
Example:
mohd
zara
abc
move_name
a_123
myname50
_temp
j
a23b9
retVal
¶ Comments
All text in Lua scripts are evaluated as code; however, you may want to include comments in your scripts to help describe what your code is doing.
Use -- to create a comment!
Example:
-- this text is counted as a comment and will not be evaluated as code
local isThisValidCode = true -- comments can be added at the end of lines of code as well!
this text is not commented and will cause errors :(
¶ Operators[2]
| Operator | Description | Example |
|---|---|---|
+ |
Adds two operands. | 5 + 10 will return 15 |
- |
Subtracts second operand from the first. | 5 - 10 will return -5 |
* |
Multiply both operands. | 5 * 10 will return 50 |
/ |
Divide first operand by the second. | 5 / 10 will return 0.5 |
% |
Performs integer division returning the remainder, divides the first operand by the second. | 5 % 10 will return 5 |
^ |
Exponent operator. | 5^2 will return 25 |
- |
Unary operator that negates the operand. | -5 will return -5 |
| Operator | Description | Example |
|---|---|---|
== |
Checks if the two operands are equal. | 5 == 10 will return false |
~= |
Checks if the two operands are not equal. | 5 ~= 10 will return true |
> |
Checks if the first operand is greater than the second operand. | 5 > 10 will return false |
< |
Checks if the first operand is less than the second operand. | 5 < 10 will return true |
>= |
Checks if the first operand is greater than or equal to the second operand. | 5 >= 10 will return false |
<= |
Checks if the first operand is less than or equal to the second operand. | 5 <= 10 will return true |
| Operator | Description | Example |
|---|---|---|
and |
Logical AND operator. | true and false will return false |
or |
Logical OR operator. | true or false will return true |
not |
Logical NOT operator. | not (true and false) will return true |
| Operator | Description | Example |
|---|---|---|
.. |
Concatenates two strings. | "Hello" .. "Yoimiya" will return "HelloYoimiya" |
# |
Unary operator that returns the length of a string or table. | #"Yoimiya" will return 7 |
Variables are used to store data in a program. In Client Control scripts, they can used to store values like the player's name, how many times the player clicked a button, or references to other Client Controls.
¶ Lua
When creating variables in Lua for Client Control scripts, use the local keyword followed by the variable name following identifier rules.
Like Node Graph Variables, variables in Lua scripts cannot be directly read or modified by other scripts.
Example:
local playerName = "HAMINPANTS" -- Creates a variable called playerName holding the value "HAMINPANTS"
local numberOfClicks = 0 -- Creates a variable called numberOfClicks holding the value 0
local imageClientControl -- Creates a variable called imageClientControl holding no value (nil)
You may find it helpful to name your variables with
camelCaseorsnake_case; stick to one method of naming your variables, unique from how you name functions!
Lua is a dynamically-typed language; you do not declare the data type when creating variables, and variables can be freely reassigned to values of different types at runtime.
¶ Miliastra-like
The Lua example is similar to doing the following in Miliastra:
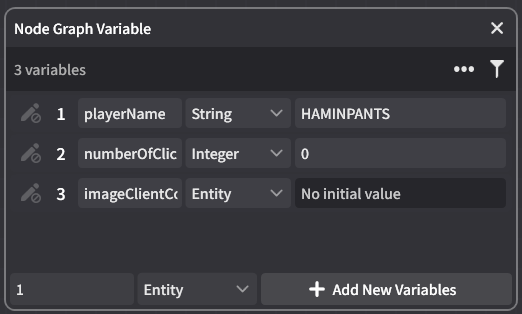
Unlike Lua, Miliastra is strongly-typed meaning you must declare the data type when declaring variables and performing operations.
The most common data types you will work with while scripting in Miliastra include:
¶ Lua
Represents the absence of a value. Evaluates to false in conditional statements.
Example:
local myNilValue = nil
local anUnsetVariable -- Variables delcared without an assigned value also evaluate to nil
¶ Miliastra-like
There is no Miliastra-like example, as all unset values default to their type's default value if unset in Miliastra.
¶ Lua
Represents a true or false value.
Example:
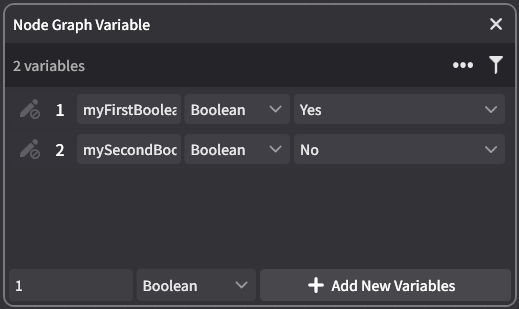
local myFirstBoolean = true
local mySecondBoolean = false
¶ Miliastra-like
The Lua example is like doing the following in Miliastra:
¶ Lua
Represents both integer and floating-point numbers.
Example:
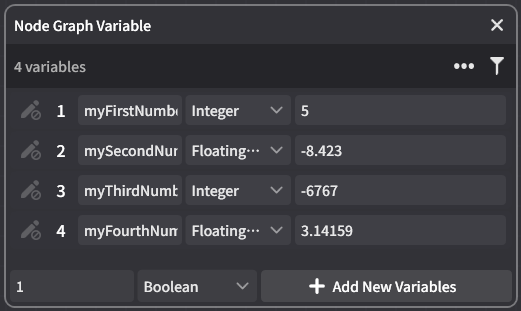
local myFirstNumber = 5
local mySecondNumber = -8.423
local myThirdNumber = -6767
local myFourthNumber = 3.14159
¶ Miliastra-like
The Lua example is similar to doing the following in Miliastra:
¶ Lua
Represents a sequence of characters.
Example:
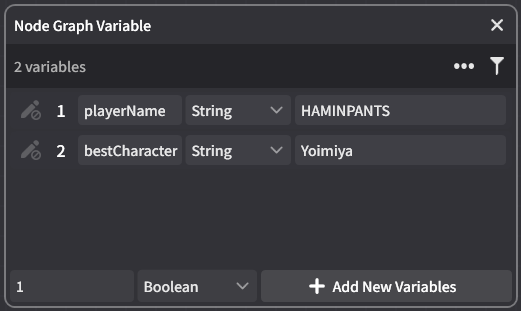
local playerName = "HAMINPANTS"
local bestCharacter = "Yoimiya"
¶ Miliastra-like
The Lua example is similar to doing the following in Miliastra:
¶ Lua
Functions will be covered in more detail in the "Functions" tab.
Represents a sequence of code which can be executed.
Example:
local doMath = function(a, b)
  print(a + b)
  return a + b
end
Functions are typically not created by assignment to a variable. This example is only used to illustrate that functions are considered a data type.
The standard function declaration is as follows:function DoMath (a, b) print (a + b) return a + b end
¶ Miliastra-like
Functions are similar to Composite Nodes; however, Composite Nodes cannot be stored as variables so there is no Miliastra-like example.
¶ Lua
Tables will be covered in more detail in the "Data Structures" tab.
Represents both arrays and dictionaries.
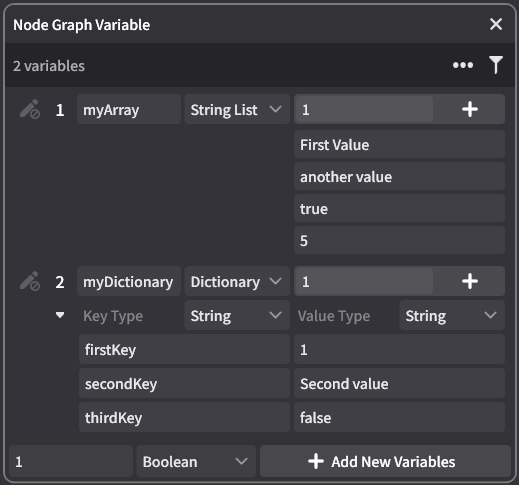
Example:
-- This creates a variable myArray array storing 2 strings, 1 boolean, and 1 number sequentially
local myArray = { "First value", "another value", true, 5 }

-- This creates a variable named myDictionary mapping keys to values
local myDictionary = {
  firstKey = 1,
  secondKey = "Second value",
  thirdKey = false
}
Because Lua is dynamically typed, tables can store arrays and dictionaries that contain multiple different data types.
¶ Miliastra-like
The Lua example is similar to doing the following in Miliastra:
Control structures are used to dictate how code is executed.
Lua does not have a
switchcontrol structure.
The if/else control structure is used to execute specific blocks of code based on a condition.
¶ Lua
Use the if ... then keywords to enclose a condition that determines whether the following code block should execute. If/else control structures must end with the end keyword.
- Example A:
local age -- Let age be any number
if age < 20 then
  print("You're younger than 20!") -- "You're younger than 20!" will only be printed to the console if age is less than 20
end
Use the elseif ... then keyword to enclose a condition that determines whether a following code block should execute if the preceding if and elseif statements evaluate to false.
- Example B:
local age -- Let age be any number
if age < 20 then
  print("You're younger than 20!") -- "You're younger than 20!" will only be printed to the console if age is less than 20
elseif age < 40 then
  print("You're still young!") -- "You're still young!" will only be printed to the console if age is not less than 20 and age is less than 40
end
Use the else keyword to execute code when all prior conditional statements evaluate to false.
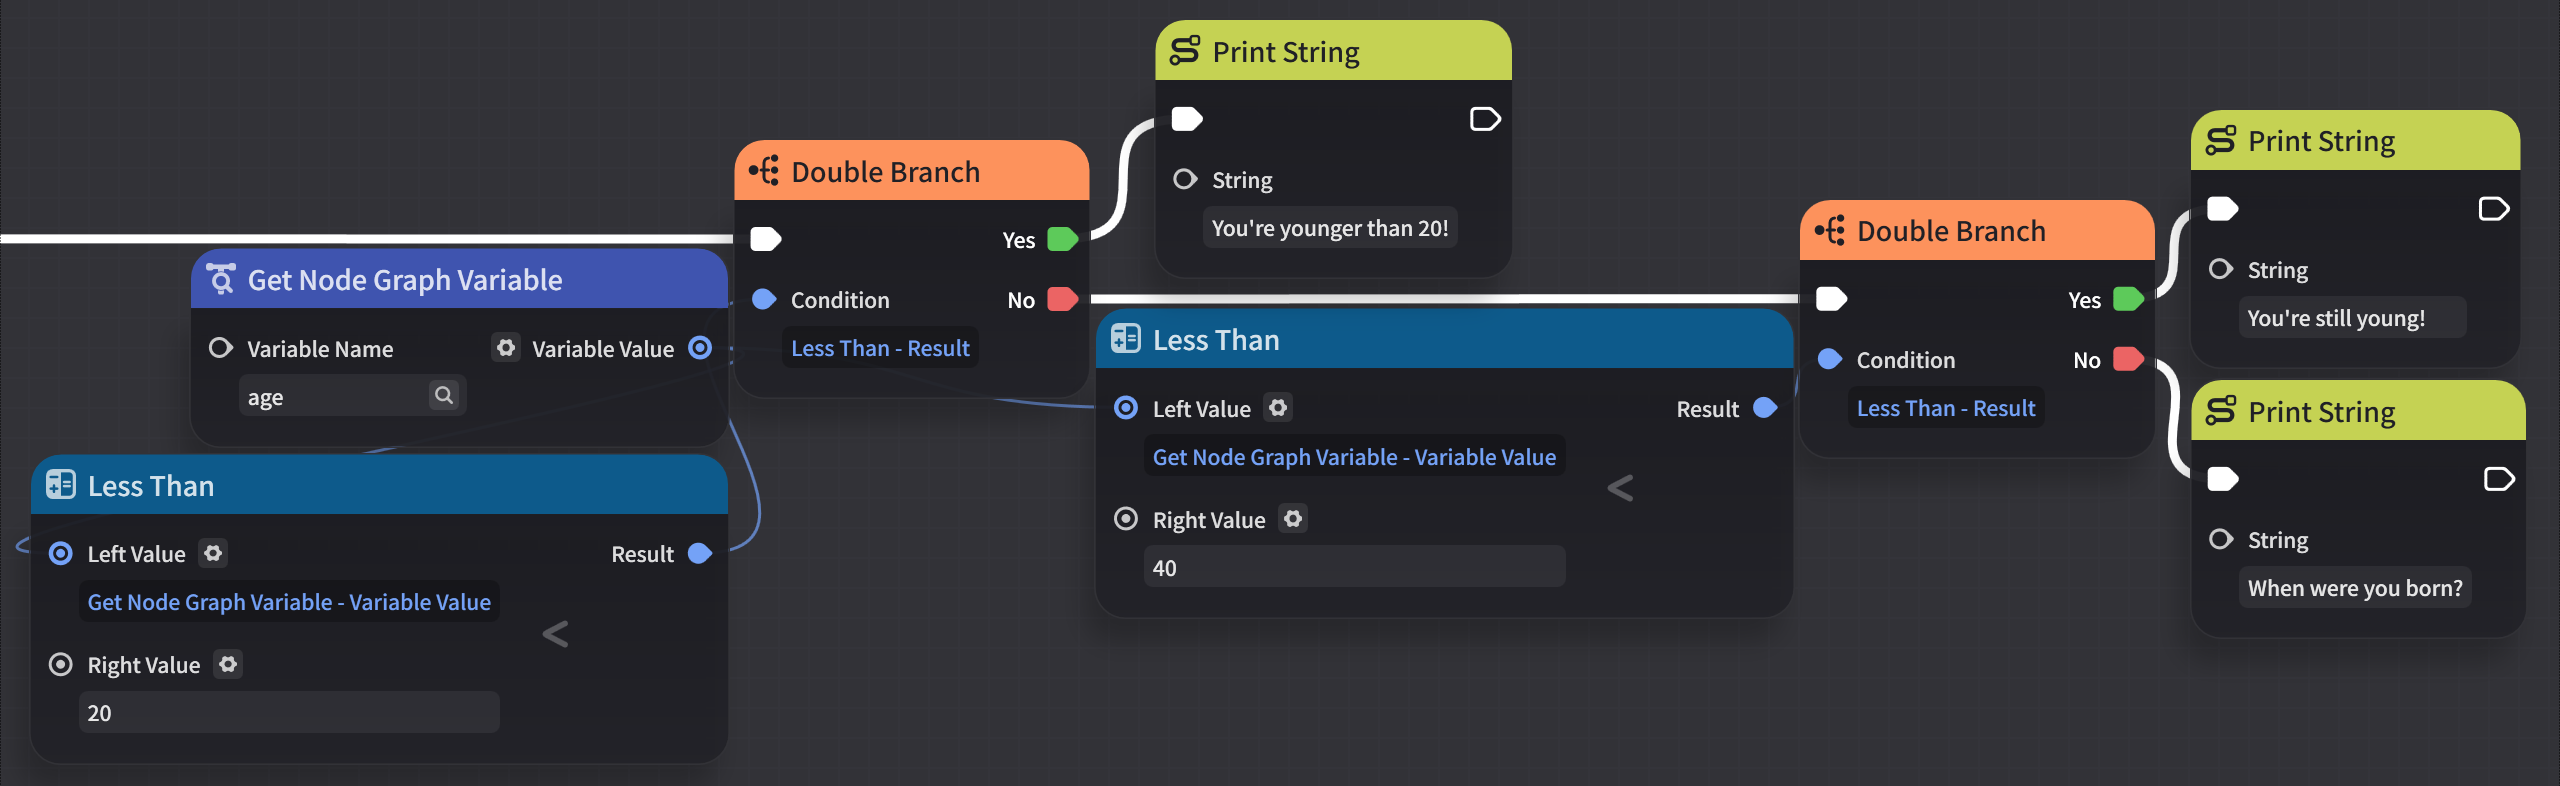
- Example C:
local age -- Let age be any number
if age < 20 then
  print("You're younger than 20!") -- "You're younger than 20!" will only be printed to the console if age is less than 20
elseif age < 40 then
  print("You're still young!") -- "You're still young!" will only be printed to the console if age is not less than 20 and age is less than 40
else
  print("When were you born?") -- "When were you born?" will only be printed to the console if age is not less than 40
end
¶ Miliastra-like
- The following Node Graph execution is similar to Example C:
This section will touch on Lua tables, so it may be helpful to read the Data Structures section first.
The for loop control structure is used to execute a block code a specified number of times while keeping track of the number of loops that have been executed so far.
¶ Lua
There are 3 ways to declare a for loop. Every loop declaration must be end with the end keyword.
Method 1: for a = b, c, d do
- This declaration format is used for simple iteration. Best for running a block of code a set number of times or iterating over the array sequence of a table.
Parameter Description aAn identifer that represents the current loop iteration.
Commonly a single character starting fromi, advancing to the next character when nesting loops.bThe starting value of the loop iteration.
Commonly1since the array sequence of tables start at1.cThe greatest value for which the loop should execute its body.
This value must be a number; the length of a table's array sequence can be passed by using the length operator (#).d(Optional) The increment value. Defaults to 1if not specified. - Example A:
Outputfor i = 2, 9, 2 do print(i) end2 4 6 8 - Example B:
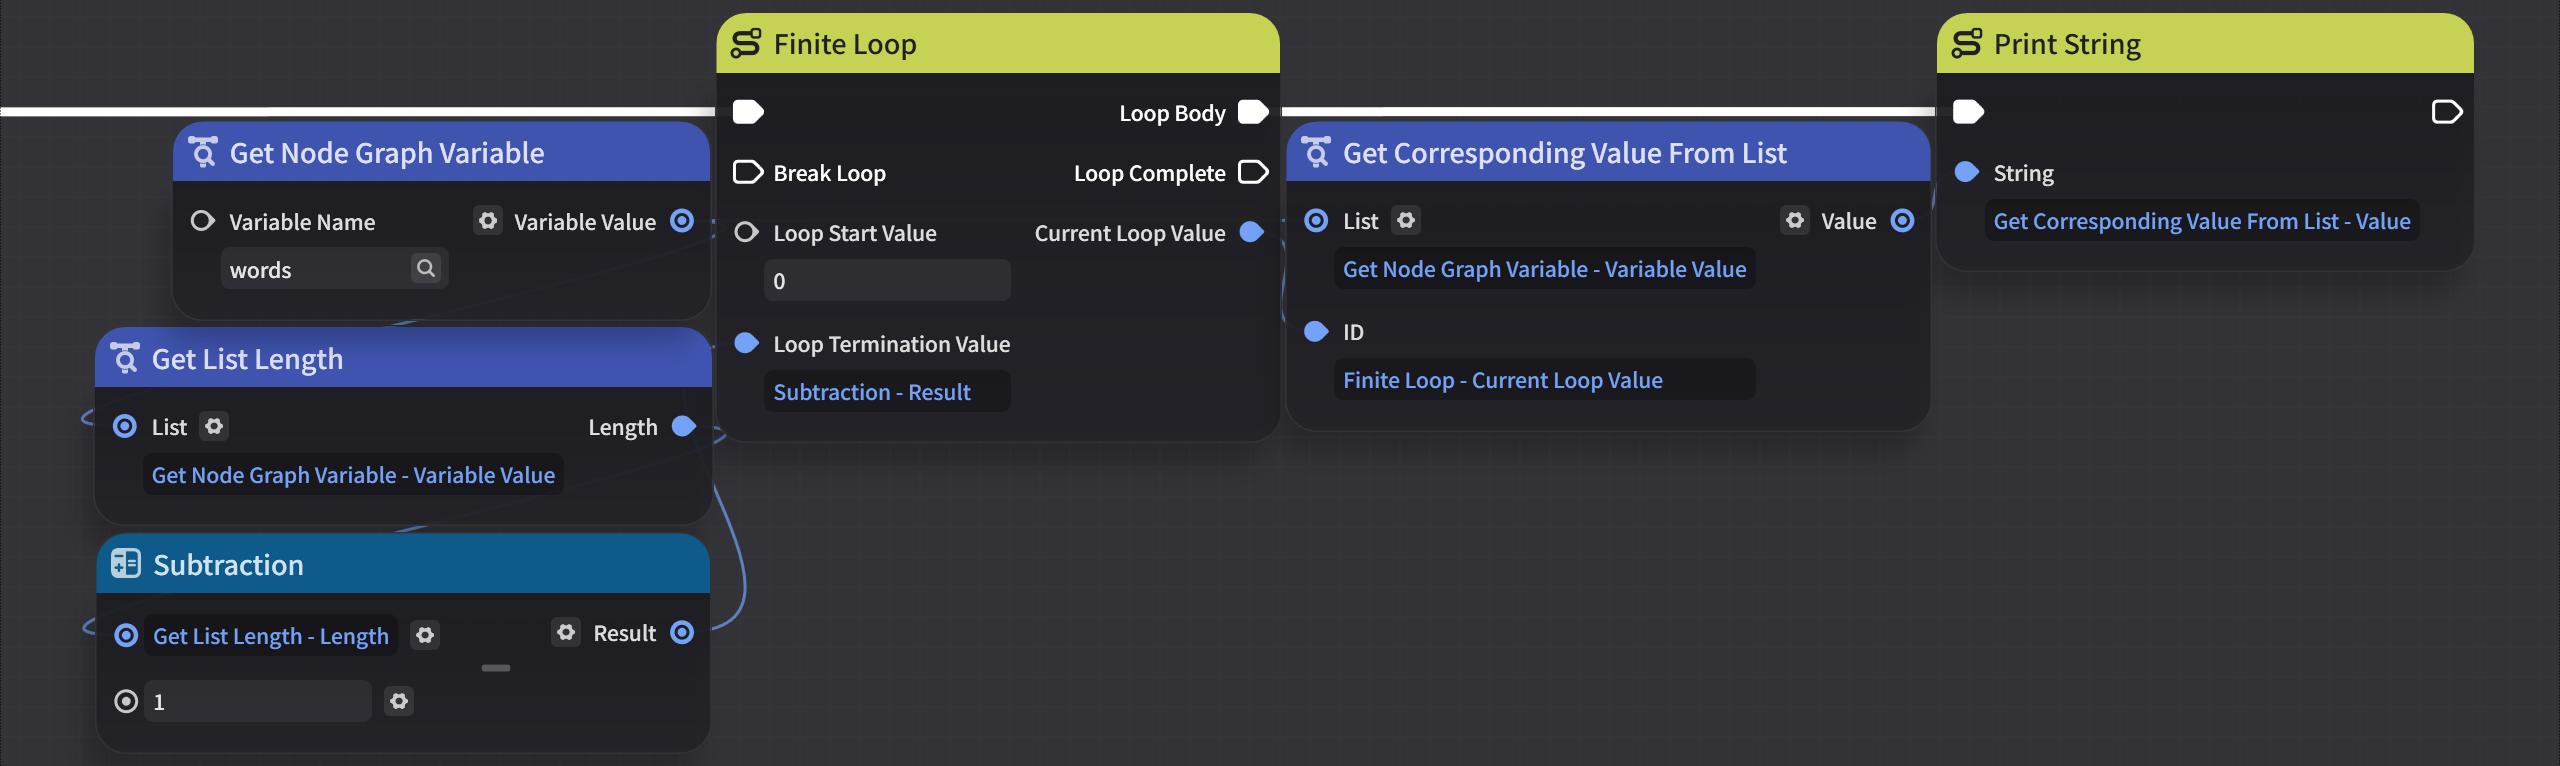
Outputlocal words = { "Yoimiya", "is", "the", "best", "character" } for i = 1, #words do print(words[i]) endYoimiya is the best character
Method 2: for a, b, in ipairs(c) do
- This declaration format is an alternative method of looping over the array sequence of a table.
Parameter Description aAn identifier that represents the current loop iteration. When not needed, it can be set to _to be ignored.bAn identifier that represents the value at the array sequence index of the specified table passed as parameter c.cThe table to iterate over. - Example C:
Outputlocal values = { "Yoimiya", true, 3.14159 } for index, value in ipairs(values) do print(tostring(value) .. "(" .. index .. ")") endYoimiya(1) true(2) 3.14159(3) - Example D:
Outputlocal words = { "Yoimiya", "is", "the", "best", "character" } for _, word in ipairs(words) do print(word) endYoimiya is the best character
Method 3: for a, b, in pairs(c) do
- This declaration format is used for looping over entire tables. Looping over tables does not guarantee a consistent order.
Parameter Declaration aAn identifier that represents the value of the field currently being evaluated. Can be set to _to be ignored.bAn identifier that represents the value associated with the field currently being evaluated. cThe table to iterate over. - Example E:
Outputlocal table = { myField = 67, ["a field with spaces in the name"] = "a string value", } for key, value in pairs(table) do print(key) print(value) endmyField 67 a field with spaces in the name a string value
¶ Miliastra-like
- The following Node Graph execution is similar to Example B:
- The following Node Graph execution is similar to Example E:

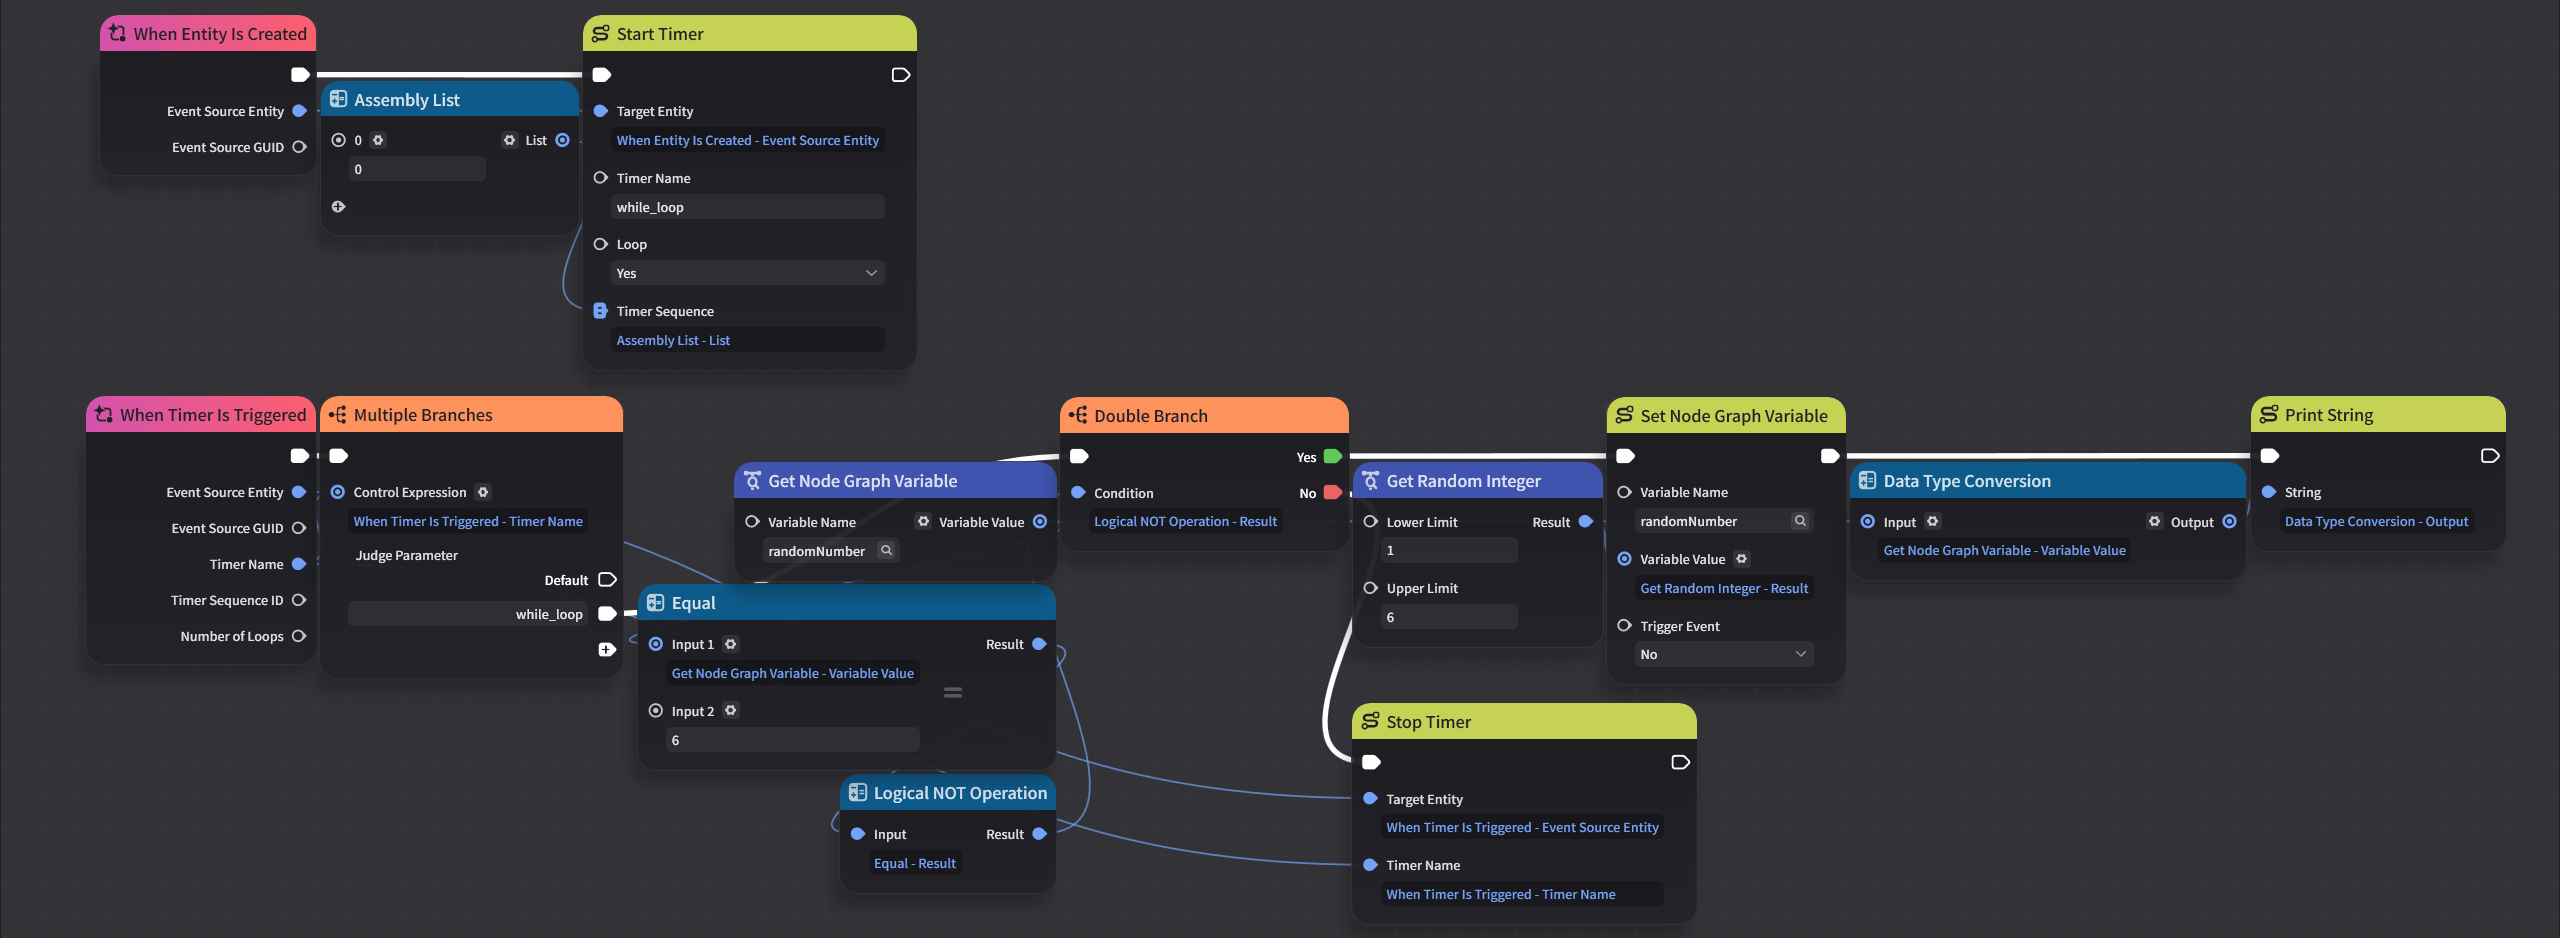
The while loop control structure is used to repeatedly execute a block of code as long as a condition is true. You must be sure to update a variable tied to the loop condition within the while loop to ensure you don't accidentally create an infinite loop!
¶ Lua
Use the while ... do keywords to enclose a condition that determines when the code in the following code block should stop executing. The code within the while loop may not execute if the condition is already false before the while loop starts.
Example:
local randomNumber
while randomNumber ~= 6 do
  randomNumber = math.random(6)
  print(randomNumber)
end
(Possible) Output
3
5
1
2
6
¶ Miliastra-like
Miliastra does not have a while loop equivalent; however, the behavior can be somewhat replicated using Timers:
Functions are used to create sequences of code that can be executed by a reference. Data can be passed into functions through parameters, and data can be returned once the function completes. Functions are useful for simplifying sections of commonly used or complex code to help keep code organized.
¶ Lua
To create functions in Lua scripts, use the function keyword followed by an identifier and a set of parentheses. All function declarations must end with the end keyword, and all code between the parentheses and end keyword will be executed whenever the function is called.
- Example A:
Output:function SayHello() print("Hello Yoimiya!") end SayHello()Hello Yoimiya!
You may find it helpful to name your functions with
PascalCase; stick with one method of naming your functions, unique from how you name your variables!
Within the function declaration parentheses, you can add any number of identifiers separated by commas to create parameters. You can reference parameters in the function body allowing you to pass data into the function.
- Example B:
Outputfunction SayHello(fromName, toName) print(fromName .. " says hello to " .. toName .. "!") end SayHello("Yoimiya", "Ayaka")Yoimiya says hello to Ayaka! - Example C:
Outputfunction DoMath(a, b) print(a + b) print(a - b) print(a * b) print(a / b) end DoMath(5, 10)15 -5 50 0.5
Parameters which are not set when a function is called will be
nil.
Use the return keyword in the function body to immediately end execution. Values specified immediately after the return keyword can be stored into variables or passed into other functions. If returning multiple values, each value must be separated by a comma.
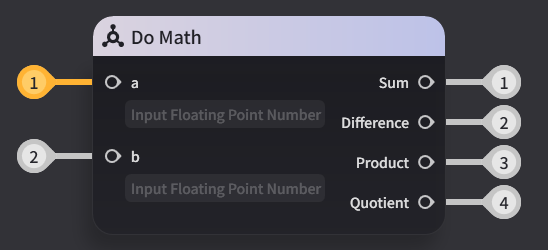
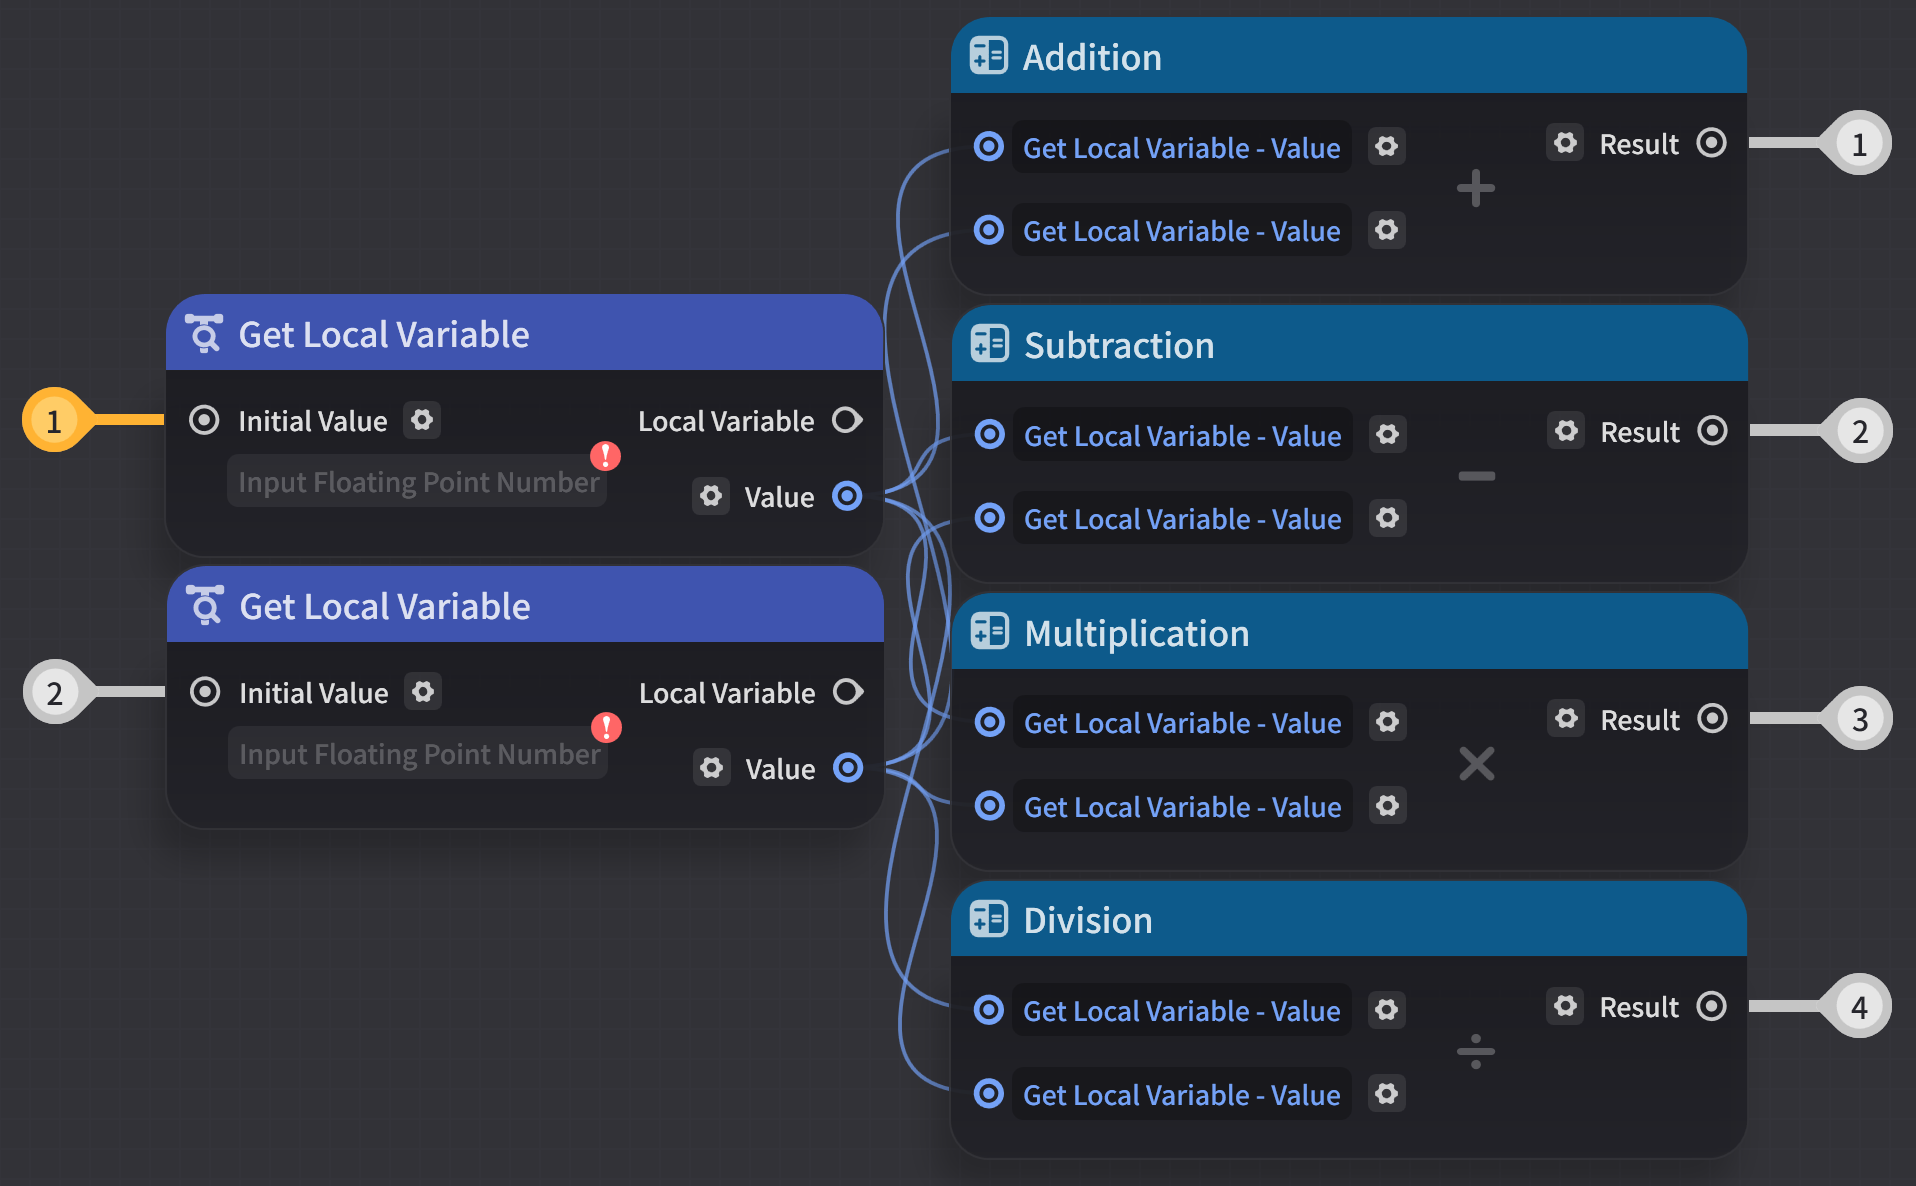
- Example D:
Outputfunction DoMath(a, b) return a + b, a - b, a * b, a / b end local sum, difference, product, quotient = DoMath(5, 10) print(sum) print(difference) print(product) print(quotient)15 -5 50 0.5 - Example E:
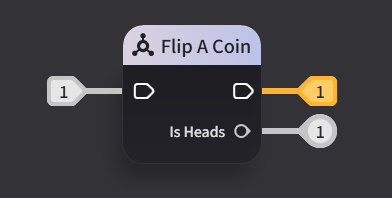
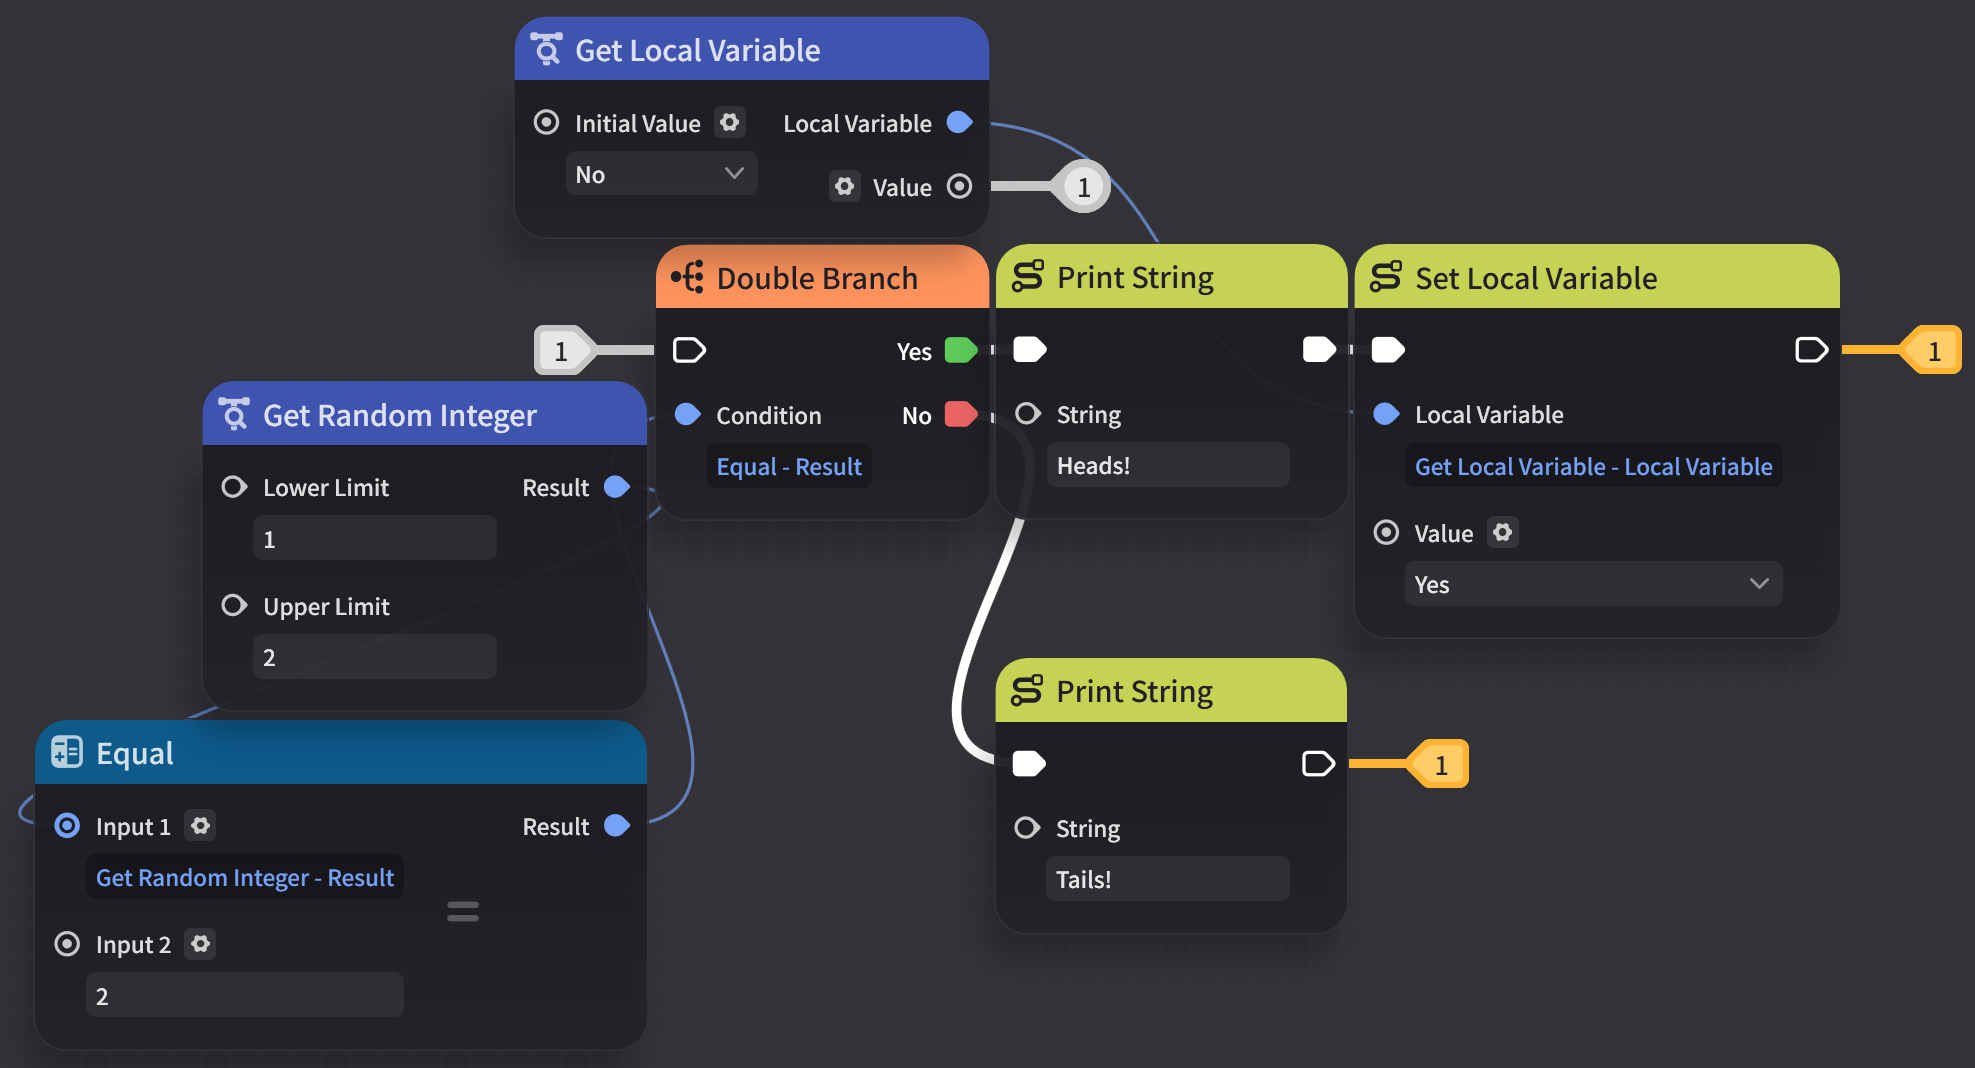
(Possible) Outputfunction FlipACoin() if (math.random(1, 2) == 2) then print("Heads!") return true end print("Tails!") return false end for i = 1, 5 do print(FlipACoin()) endHeads true Heads true Tails false Heads true Tails false
¶ Miliastra-like
- The following Composite Node is similar to Example D:
- The following Composite Node is similar to Example E:
Data Structures are used to store and manipulate groups of data efficiently. The most commonly used data structure types include arrays, which organize values into a list-like format; and dictionaries, which organize values into key-pair entries.
¶ Lua
Tables are the only data structure Lua offers, behaving as both an array and dictionary. Entries in tables are are commonly referred to as fields, and they typically map one value to another. Tables can be created by using a pair of curly braces.
- Example A:
local myTable = {}
Once created, table fields can be created and modified in the following ways:
Method 1: a
This declaration format can only be used within the curly brackets when creating a table. The value will automatically be assigned to the next available array sequence index.
The array sequence of a table refers to the list of non-
nilfields with sequential positive integer keys starting at1.
| Parameter | Description |
|---|---|
a |
A value that will be assigned to the next sequential numerical field. |
- Example B:
Outputfunction PrintTable(table) for key, value in pairs(table) do print(tostring(key) .. "=" .. tostring(value)) end end local myTable = { "my first string", true, "my second string" } PrintTable(myTable)1=my first string 2=true 3=my second string
Method 2: a = b
This declaration format can only be used within the curly brackets when creating a table.
| Parameter | Description |
|---|---|
a |
An identifier that represents the field's name. |
b |
The value to assign to the field. |
- Example C:
Output:function PrintTable(table) for key, value in pairs(table) do print(tostring(key) .. "=" .. tostring(value)) end end local myTable = { firstField = "the first field", "field created using method 1", secondField = false } PrintTable(myTable)firstField=the first field 1=field created using method 1 secondField=false
Method 3: [a] = b
This declaration format can only be used within the curly brackets when creating a table.
| Parameter | Description |
|---|---|
a |
A unique value that represents the key to which b will be mapped to. |
b |
The value to assign to the field. |
- Example D:
Output:function PrintTable(table) for key, value in pairs(table) do print(tostring(key) .. "=" .. tostring(value)) end end local myTable = { ["the first field"] = "the first value", [2] = 3.14159, "field created using method 1" } PrintTable(myTable)1=field created using method 1 2=3.14159 the first field=the first value
Method 4: a.b = c
This declaration format is used to add or set fields after creating the table.
| Parameter | Description |
|---|---|
a |
The table to modify. |
b |
An identifier representing the table field to set. |
b |
The value to assign to the specified field. |
- Example D:
Output:function PrintTable(table) for key, value in pairs(table) do print(tostring(key) .. "=" .. tostring(value)) end end local myTable = { firstField = "the first field", secondField = false } myTable.secondField = "the second field" -- this will overwrite the value currently stored in secondField myTable.thirdField = "the third field" PrintTable(myTable)firstField=the first field secondField=the second field thirdField=the third field
Method 5: a[b] = c
This declaration format is used to add or set fields after creating the bale.
| Parameter | Description |
|---|---|
a |
The table to modify. |
b |
A value that represents the key to which the value will be mapped to. |
b |
The value to assign to the specified field. |
- Example E:
Output:function PrintTable(table) for key, value in pairs(table) do print(tostring(key) .. "=" .. tostring(value)) end end local myTable = { firstField = "the first field", secondField = false } myTable["secondField"] = "the second field" -- this will also overwrite the value stored in secondField! myTable[1] = "a field at index 1" PrintTable(myTable)firstField=the first field secondField=the second field 1=a field at index 1
Method 6: table.insert(a, b, c)
This declaration format is used to insert or append a value to a table based on the table's array sequence.
| Parameter | Description |
|---|---|
a |
The table to modify. |
b |
(Optional) The numerical index at which to insert the value. If not specified, the value will be appended using the last contiguous numerical index. |
b |
The value to insert/append. |
- Example F:
Output:function PrintTable(table) for key, value in pairs(table) do print(tostring(key) .. "=" .. tostring(value)) end end local myTable = { "first value", extraField = "Hello Yoimiya!", "second value" } table.insert(myTable, "third value") table.insert(myTable, 3, "value between second value and third value") PrintTable(myTable)1=first value 2=second value 3=value between second value and third value 4=third value extraField=Hello Yoimiya!
Method 7: a[#a + 1] = b
This declaration format is an alternative way to append values to the array sequence of a table. It is slightly more efficient compared to Method 6, but generally unadvised to use due to unpredictable behavior with nil values.
- Example G:
Output:function PrintTable(table) for key, value in pairs(table) do print(tostring(key) .. "=" .. tostring(value)) end end local myTable = { "first value", extraField = "Hello Yoimiya!", "second value" } myTable[#myTable + 1] = "third value" myTable[#myTable + 1] = "fourth value" PrintTable(myTable)1=first value 2=second value 3=third value 4=fourth value extraField=Hello Yoimiya!
To access a field from a table, you can use dot notation for fields which obey identifier rules. To access other fields, use square brackets with the value of the field you want to access inside. When trying to get the value of a field which hasn't been set, you will get nil.
- Example G:
Output:local myTable = { "string key" = 67, "first value", "second value", bestCharacter = "Hello Yoimiya!", [true] = "yep, it's true" } print(myTable["string key"]) print(myTable.bestCharacter) print(myTable[2]) print(myTable[true])67 Hello Yoimiya! second value yep, it's true
¶ Miliastra-like
Structures and dictionaries are the closest feature Miliastra has to Lua tables; however, there are no examples that can accurately represent the behavior of Lua tables in Miliastra.
Scroll back to Lua Basics
Don't forget to read (or skim) through each section!
¶ Script Behaviors
This section contain important information on how Lua scripts work in Miliastra Wonderland; it's recommended to read each tab thoroughly!
All Lua scripts for a project must be within the external_lua_file folder for the corresponding save. For a Lua script to be attached to a Client Control, a Script Mapping for the corresponding script must be created in the Client Script Resource Explorer; otherwise, the script will not register as part of the project. Lua scripts without mappings will not be able to be attached to Client Controls, will not count toward the project's file size limit, and will not be exported when exporting the save.
¶ Creating Script Mappings
To create a Script Mapping, open the Client Script Resource Explorer in the Miliastra Sandbox and right click on an empty area after selecting a folder. The following options can be used:
| Option | Description |
|---|---|
| Create Script Mapping | Creates an unmapped and unnamed Script Mapping. Click the pencil icon under the "File Path" column to select the Lua script the mapping corresponds to. |
| New Client Script | Opens a File Explorer prompt to create a Lua script. Once created, a Script Mapping with the same name as the created Lua script is automatically created and mapped. |
| Batch Add Script Files > Add by File | Opens a File Explorer prompt to select Lua scripts to create mappings for. Each selected file will have a Script Mapping created, mapped, and named as the corresponding file. |
| Batch Add Script Files > Add by Folder | Opens a File Explorer prompt to select a folder. All Lua scripts in the selected folder will have a Script Mapping created, mapped, and named as the corresponding file. |
All scripts attached to a Client Control call specific functions during their lifecycle; it is strongly recommended for all code to be within a lifecycle function to ensure consistent behavior at runtime.
¶ Lifecycle Functions
| Function | Description |
|---|---|
OnInit() |
Called when the Client Control that the script is attached to is initialized. |
OnEnable() |
Called when the active state of the Client Control that the script is attached to changes to true. |
OnStart() |
Called after the first time OnEnable is called on the Client Control that the script is attached to. |
OnUpdate(deltaTime: number) |
Called once per frame when updates have been enabled for the script. |
OnLevelUpdate(deltaTime: number) |
Called once per frame when updates have been enabled for the script. Not called when level time is paused in singleplayer stages. |
OnDisable() |
Called when the active state of the Client Control that the script is attached to changes to false. |
OnDestroy() |
Called when the Client Control that the script is attached to is destroyed. |
¶ Lifecycle Behavior
Lifecycle functions are called in the following order:
Top Level Code > OnInit   Global Script
Top Level Code > OnInit   Client Control Hierarchy
OnEnable                  Client Control Hierarchy
OnStart                   Client Control Hierarchy
OnEnable                  Global Script
OnStart                   Global Script
OnUpdate > OnLevelUpdate  Global Script
OnUpdate > OnLevelUpdate  Client Control Hierarchy
OnDestroy                 Global Script (On Stage End)
¶ Notes
- Lifecycle functions are called in order of self, then children in reverse-hierarchy (last-to-first) order starting from the root ContainerControl.
- If Client Controls are instantiated in
OnStart, the instantiated Client Control immediately evaluates top level code,OnInit,OnEnable, thenOnStart. - If Client Controls are deactivated through
SetActive(false)in or beforeOnInit,OnEnableandOnDisablelifecycle functions will not be called. Otherwise, theOnDisablelifecycle function is called immediately. - When a Client Control is destroyed, the
OnDisable()thenOnDestroyed()lifecycle functions will be called on itself, and all children immediately.
¶ Example
Consider the following Client Control hierarchy:
Root (ContainerControl)
├─ Child_1 (ContainerControl)
│  └─ Child_1:Child_1 (ContainerControl)
├─ Child_3 (ContainerControl)
└─ Child_2 (ContainerControl)
   ├─ Child_2:Child_1 (ContainerControl)
   └─ Child_2:Child_2 (ContainerControl)
All the Client Controls in the hierarchy have the following script attached:
Except for the Global Script, which prints "... Global Script" instead of script.object.name
local loggedFirstUpdate
local loggedFirstLevelUpdate

print(string.format("%-20s %s", "Top Level 1", script.object.name))

function OnInit()
  print(string.format("%-20s %s", "OnInit", script.object.name))
  script:EnableUpdate(true)
end

function OnEnable()
  print(string.format("%-20s %s", "OnEnable", script.object.name))
end

function OnStart()
  print(string.format("%-20s %s", "OnStart", script.object.name))
end

function OnDisable()
  print(string.format("%-20s %s", "OnDisable", script.object.name))
end

function OnDestroy()
  print(string.format("%-20s %s", "OnDestroy", script.object.name))
end

function OnUpdate(dt)
  if loggedFirstUpdate and loggedFirstLevelUpdate then
    script:EnableUpdate(false)
  elseif not loggedFirstUpdate then
    print(string.format("%-20s %s", "First OnUpdate", script.object.name))
    loggedFirstUpdate = true
  end
end

function OnLevelUpdate(dt)
  if loggedFirstUpdate and loggedFirstLevelUpdate then
    script:EnableUpdate(false)
  elseif not loggedFirstLevelUpdate then
    print(string.format("%-20s %s", "First OnLevelUpdate", script.object.name))
    loggedFirstLevelUpdate = true
  end
end

print(string.format("%-20s %s", "Top Level 2", script.object.name))
Entering a Test Play and then abandoning the Test Play will produce the following log output:
Top Level 1          Global Script
Top Level 2          Global Script
OnInit               Global Script
Top Level 1          Root
Top Level 2          Root
OnInit               Root
Top Level 1          Child_2
Top Level 2          Child_2
OnInit               Child_2
Top Level 1          Child_2:Child_2
Top Level 2          Child_2:Child_2
OnInit               Child_2:Child_2
Top Level 1          Child_2:Child_1
Top Level 2          Child_2:Child_1
OnInit               Child_2:Child_1
Top Level 1          Child_3
Top Level 2          Child_3
OnInit               Child_3
Top Level 1          Child_1
Top Level 2          Child_1
OnInit               Child_1
Top Level 1          Child_1:Child_1
Top Level 2          Child_1:Child_1
OnInit               Child_1:Child_1
OnEnable             Root
OnEnable             Child_2
OnEnable             Child_2:Child_2
OnEnable             Child_2:Child_1
OnEnable             Child_3
OnEnable             Child_1
OnEnable             Child_1:Child_1
OnStart              Root
OnStart              Child_2
OnStart              Child_2:Child_2
OnStart              Child_2:Child_1
OnStart              Child_3
OnStart              Child_1
OnStart              Child_1:Child_1
OnEnable             Global Script
OnStart              Global Script
First OnUpdate       Global Script
First OnLevelUpdate  Global Script
First OnUpdate       Root
First OnLevelUpdate  Root
First OnUpdate       Child_2
First OnLevelUpdate  Child_2
First OnUpdate       Child_2:Child_2
First OnLevelUpdate  Child_2:Child_2
First OnUpdate       Child_2:Child_1
First OnLevelUpdate  Child_2:Child_1
First OnUpdate       Child_3
First OnLevelUpdate  Child_3
First OnUpdate       Child_1
First OnLevelUpdate  Child_1
First OnUpdate       Child_1:Child_1
First OnLevelUpdate  Child_1:Child_1
First OnDestroy      Global Script
Each stage can have one Global Script configured in Stage Settings > Basic. When the stage starts, all clients create their own instance of the configured Global Script. All lifecycle functions, Signal listener callbacks, Custom Variable Changed listener callbacks, keyboard event listener callbacks, and controller event listener callbacks will execute normally, even if the current UI layout does not have an active Client Control Container component. There is currently no known method of getting the script instance of the Global Script, as such, Modules have to be used to pass data and call functions between Attached Scripts and the Global Script.
The
objectfield of theScriptattached to the Global Script will always beniland cannot be set.
Scripts that have been mapped can be attached to Client Controls by selecting the desired Client Control, switching to the Script tab, and selecting Add Script in the Manage UI Control Groups interface. Each Script Mapping can only be attached to a Client Control once, and each instance of the Client Control will have its own instance of the script. This means that changes to a variable in one script instance will not affect the same variable's value in a different instance of the script.
¶ Example
Consider the following hierarchy:
Root (ContainerControl)
├─ CursorEventArea_A (CursorEventArea)
└─ CursorEventArea_B (CursorEventArea)
Where CursorEventArea_A and CursorEventArea_B both have the Script Mapping ClickCounter, mapped to ClickCounter.lua, attached:
-- ClickCounter.lua
local clicks = 0

function OnStart()
  script.object:AddCursorEventListener(
    Enum.CursorEventType.CursorClick,
      function(e)
        clicks = clicks + 1
        print(script.object.name .. ": " .. clicks)
      end
    )
end
Clicking CursorEventArea_A twice, then CursorEventArea_B once, then CursorEventArea_A once will result in the following output:
CursorEventArea_A: 1
CursorEventArea_A: 2
CursorEventArea_B: 1
CursorEventArea_A: 3
Modules are a feature native to Lua, allowing you to define a shared set fields and functions which can be added to Lua scripts as needed.
¶ Creating a Module
Create a module by creating a variable initialized as an empty table. At the end of the script, return the created variable:
-- external_lua_file/MyModule.lua
local MyModule = {}

return MyModule
Fields and functions defined on the created table will be accessible and modifiable by all scripts importing the module. Variables created using the local keyword will still retain a shared value, but cannot be directly accessed or modified:
-- external_lua_file/MyModule.lua
local MyModule = {}
MyModule.MyField = "Foo"

local myVar = "Bar"

function MyModule.MyFunction(param)
  print(param)
end

return MyModule
¶ Using Modules in Other Scripts
"Import" a module to another Lua script by creating a variable and assigning it to require("a"), where a is the name of the Lua script's file, without the extension:
-- external_lua_file/MyScript.lua
local MyModule = require("MyModule")
¶ Notes
- Modules should not be attached to Client Controls, but must have a Script Mapping.
- The Script Mapping name does not need to match the Lua script's file name; however, it is recommended to do so to keep your project organized.
- Modules do not call any lifecycle functions or event listener callbacks.
- If the module is located in a subfolder within the
external_lua_filefolder, the relative path must be specified in therequirestatement.- E.g.,
subfolder/MyModule
- E.g.,
¶ Example
Consider the following hierarchy:
Root (ContainerControl)
├─ CursorEventArea_A (CursorEventArea)
└─ CursorEventArea_B (CursorEventArea)
Where CursorEventArea_A and CursorEventArea_B both have the Script Mapping ClickCounter, mapped to ClickCounter.lua, attached:
-- ClickCounter.lua
local MyModule = require("MyModule")

function OnStart()
  script.object:AddCursorEventListener(
    Enum.CursorEventType.CursorClick,
    function(e)
      MyModule.MyCounter = MyModule.MyCounter + 1
      MyModule.PrintCounterValue(script.object.name)
    end
  )
end
And the Script Mapping MyModule is mapped to MyModule.lua:
-- MyModule.lua
local MyModule = {}
MyModule.MyCounter = 0

local firstEditor

function MyModule.PrintCounterValue(editor)
  if not firstEditor then
    firstEditor = editor
  end
  print(MyModule.MyCounter .. " first edited by " .. firstEditor)
end

return MyModule
Clicking CursorEventArea_B once, then CursorEventArea_A twice, then CursorEventArea_B once will result in the following output:
1 first edited by CursorEventArea_B
2 first edited by CursorEventArea_B
3 first edited by CursorEventArea_B
4 first edited by CursorEventArea_B
Scroll back to Script Behaviors
Don't forget to read through each section!
¶ Miliastra-specific Lua Features
This section is not a complete documentation of the Miliastra Lua API; the description of some fields and functions has been simplified to keep the guide concise. See the official documentation or MiliLua documentation for more details.
game is a global table which can be accessed in all Lua scripts and contains many functions that allow you to interact with the server and game state.
Functions from the game table should be called using dot notation.
¶ Notable game Functions
| Function | Description |
|---|---|
InstantiateClientControl(index: number, parent:ClientUIBaseControl) |
Creates a new instance of a Client Control using the asset index of a Client Control Template. Cannot be called before the OnStart() lifecycle function, or in the OnDestroyed() lifecycle function. |
DestroyClientControl(object: ClientUIBaseControl) |
Destroys an instance of a Client Control. Cannot be called before the OnStart() lifecycle function, or in the OnDestroyed() lifecycle function. |
Tween(target: ClientUIBaseControl, properties: table, duration: number) |
Creates an instance of a Tween. See the "Tween" tab for more info. |
TweenSequence() |
Creates an instance of a Tween Sequence. See the "Tween Sequence" tab for more info. |
GetGlobalCustomVariableValue(entityType: Enum.CustomVariableEntityType), varName: string |
Returns the value of a declared Custom Variable from the current Player, Character, or Stage Entity. |
ServerSignal(signalName: string) |
Creates an instance of a Server Signal. See the Server Signal tab for more info. |
PauseLevelTime(paused: boolean) |
Pauses or resumes level time. |
GetText() |
Gets localized text from Stage Text Variables by ID. |
GetUICanvasSize() |
Returns the width and height of the screen's viewport. |
IsTestPlay() |
Returns true if the stage is being played in a Test Play. |
¶ Example
-- Creates a new instance of the specified Client Control Template as a child of the Client Control the script is attached to.
game.InstantiateClientControl(1073741848, script.object)

-- Gets a Custom Variable called "Score" from the current Player
local score = game.GetGlobalCustomVariableValue(Enum.CustomVariableEntityType.PlayerSelf, "Score")
Script is the type that represents an instance of a Lua script attached to a Client Control. The script identifier can be used in all Client Control scripts to get the current Script instance (like using the Get Self Entity node).
Fields from script should be accessed using dot notation, and functions should be called using colon notation.
¶ Notable Script Fields
| Field | Type | Description | Access |
|---|---|---|---|
object |
*ClientUIBaseControl | The Client Control that the current Script instance is attached to. |
Read |
prefabIndex |
Number | The ID of the Client Script mapping corresponding with the current script. | Read |
alive |
Boolean | Whether the script instance and user-defined global functions are ready. | Read |
path |
String | The path to the Lua script file exluding the .lua extension. |
Read |
*The exact Client Control type is always returned.
¶ Notable Script Functions
| Function | Description |
|---|---|
EnableUpdate(enabled: boolean) |
When set to true, the script will call OnUpdate(deltaTime: number) and OnLevelUpdate(deltaTime: number) every frame and level-frame respectively. |
GetParam(param: string) |
Gets the value of a Script Variable by name. Note: Not to be confused with Custom Variables set on entities or variables defined within the target script. Script Variables are configured by right-clicking a Script Mapping in the Miliastra Sandbox and selecting Edit Script Variables. |
RegisterCustomVariableChangedHandler(entityType: Enum.CustomVariableEntityType, varName: string, callback: function()) |
Registers a Custom Variable Changed listener on the client's Player, Character, or Stage Entity. The callback function is called when a Custom Variable with varName is changed for the specified entity and Trigger Event is true. |
RegisterServerSignalHandler(signalName: string, callback: function(signalName: string, signalParams: any[])) |
Registers a Client Scripted Signal listener corresponding to signalName calling the callback function whenever received. |
¶ Example
script:EnableUpdate(true)
local myVar = script:GetParam("myScriptCustomVariable")
script:UserDefinedGlobalFunction() -- Not an API function; in practice, you should check script.alive before calling user-defined global functions
Each Client Control component has its own type which extends functionality from a base type called ClientUIBaseControl. All functions that return instances of Client Controls always return the exact type, which can be checked using the typeof global function.
This section only covers notable Client Control components. Refer to the official documentation or MiliLua documentation for more details.
ClientUIBaseControl is the type that contains the base functionality from which all Client Control components extend from. Each Client Control component has its own type which inherits all fields and functions from ClientUIBaseControl.
Fields from ClientUIBaseControl (and subtypes) should be accessed using dot notation, and functions should be called using colon notation.
¶ Notable ClientUIBaseControl Fields
| Field | Type | Description | Access |
|---|---|---|---|
parent |
*ClientUIBaseControl | The parent Client Control. This property is nil for the root Client Control of each Client Control Container. |
Read/Write |
name |
String | The name of the Client Control. | Read/Write |
anchoredPositionX |
Number | The Client Control's x position relative to its parent's bounding box. |
Read/Write/Tweenable |
anchoredPositionY |
Number | The Client Control's y position relative to its parent's bounding box. |
Read/Write/Tweenable |
sizeDeltaX |
Number | The Client Control's width. | Read/Write/Tweenable |
sizeDeltaY |
Number | The Client Control's height. | Read/Write/Tweenable |
localScaleX |
Number | The Client Control's local x scale. |
Read/Write/Tweenable |
localScaleY |
Number | The Client Control's local y scale. |
Read/Write/Tweenable |
localRotationX |
Number | The Client Control's local rotation on the x axis. |
Read/Write/Tweenable |
localRotationY |
Number | The Client Control's local rotation on the y axis. |
Read/Write/Tweenable |
localRotationZ |
Number | The Client Control's local rotation on the z axis. |
Read/Write/Tweenable |
*The exact Client Control type is always returned.
¶ Notable ClientUIBaseControl Functions
| Function | Description |
|---|---|
GetScript(id: number) |
Gets a script attached to the Client Control by mapping ID. |
AddKeyEventListener(eventType: Enum.KeyEventType, callback: function() -> boolean) |
Registers a key event listener which calls the callback function whenever triggered. |
GetAnchoredPosition() |
Returns the x and y position of the Client Control's pivot relative to the center of it's parent's bounding box.Note: It's recommended to see the full documentation of this function's behavior. |
GetSizeDelta() |
Returns the width and height of the Client Control. |
GetLocalScale() |
Returns the local x and y scale of the Client Control. |
GetLocalRotation() |
Returns the local x, y, and z rotation of the Client Control. |
SetAnchoredPosition(x: number, y: number) |
Sets the x and y position of the Client Control's pivot relative to the center of it's parent's bounding box. Behaves similarly to GetAnchoredPosition(). |
SetSizeDelta(width: number, height: number) |
Sets the width and height of the Client Control. |
SetLocalScale(x: number, y: number) |
Sets the local x and y scale of the Client Control. |
SetLocalRotation(x: number, y: number, z: number) |
Sets the local x, y, and z rotation of the Client Control. |
ClientUIContainerControl is the type that represents an instance of a ContainerControl component. All Client Control Container Server Controls include a root ContainerControl element which cannot be removed.
The ContainerControl component is helpful for encapsulating other components when creating Client Control Templates, as well as keeping the hierarchy organized.
¶ Notable ClientUIContainerControl Fields
| Field | Type | Description | Access |
|---|---|---|---|
disableKeyEventPassthrough |
Boolean | Whether keyboard input events are blocked from passing through to native game functions. | Read/Write |
disableCursorEventPassthrough |
Boolean | Whether cursor interaction events are blocked from passing through to native game functions. | Read/Write |
showCursor |
Boolean | Whether to show the cursor while the Container Control is active. | Read/Write |
ClientUICursorEventAreaControl is the type that represents an instance of a CursorEventArea component, allowing you to detect cursor events within it's bounding box. The PresetButton component may be used if non-rectangular interaction areas are needed.
¶ Notable ClientUICursorEventAreaControl Fields
| Field | Type | Description | Access |
|---|---|---|---|
raycastTarget |
Boolean | Whether the Cursor Event Area can receive cursor interaction events. | Read/Write |
¶ Notable ClientUICursorEventAreaControl Functions
| Field | Description |
|---|---|
AddCursorEventListener(eventType: Enum.CursorEventType, callback: function(eventData: CursorEventData) -> nil) |
Registers a cursor event listener to the Client Control. |
RemoveCursorEventListener(eventType: Enum.CursorEventType, callback: function(eventData: CursorEventData) -> nil) |
Removes the specified cursor event listener from the Client Control. |
SimulateCursorClick() |
Simulates the CursorDown, CursorUp, and CursorClick events in sequence. |
ClientUIGridScrollerControl is the type that represents an instance of a GridScrollerControl component, allowing you to create grid-aligned items, similar to the Single Choice Window Floating Interaction Page Server Control. Client Controls created by the GridScrollerControl are directly managed by the component and stored in an internal table that cannot be directly modified; however, individual grid items can still be modified by reference.
¶ Notable ClientUIGridScrollerControl Fields
| Field | Type | Description | Access |
|---|---|---|---|
itemCount |
Number | The number of list items that were created in the most recent refresh. | Read |
itemPrefabIndex |
Number | The Client Control Template index used to create list items when RefreshItems is called. |
Read/Write |
interactable |
Boolean | Whether the Grid Scroller can be scrolled by client input. | Read/Write |
scrollProgress |
Number | The normalized percentage representing the scroll position originating from the bottom-left corner. | Read/Write/Tweenable |
¶ Notable ClientUIGridScrollerControl Functions
| Field | Description |
|---|---|
RefreshItems(itemCount: number, callback: function(control: ClientUIBaseControl, index: number)) |
Destroys all existing list item Client Controls, then instantiates the specified number of Client Controls as list items and invokes a callback for each item, where control is the instantiated Client Control and index is the 0-indexed number corresponding to the current iteration. |
ScrollToItemAt(index: integer, scrollAlignType: Enum.ScrollAlignType) |
Instantly scrolls to the list item at the specified index. |
¶ Example
Consider the following scenario, where the itemPrefabIndex links to a Client Control Template representing a TextBoxControl component:
local myWords = { "Yoimiya", "is", "the", "best", "character." }

function OnStart()
  script.object:RefreshItems(#myWords, function(control, index)
    control.text = myWords[index + 1]
  end)
end
On start, the GridScrollerControl will create 5 children placed according to the specified grid rules, the text of each child corresponding to it's index.
ClientUIImageControl is the type that represents an instance of an ImageControl component, allowing you to display an image on the UI through a specified image asset index. Currently, custom assets cannot be displayed using the ImageControl component, so you will have to develop your own compound image solution, or find a community-made module.
¶ Notable ClientUIImageControl Fields
| Field | Type | Description | Access |
|---|---|---|---|
imageColor |
ColorValue | The color of the image. | Read/Write/Tweenable |
enableMask |
Boolean | Whether masking is enabled for the image. When true, all children will not render on transparent pixels of the image. |
Read/Write |
enableSoftEdge |
Boolean | Whether soft edge is enabled for the image. | Read/Write |
fillType |
Enum.ImageFillType | The fill type of the image. | Read/Write |
fillAmount |
Number | The normalized percentage of the image that should be revealed. | Read/Write/Tweenable |
¶ Notable ClientUIImageControl Functions
| Field | Description |
|---|---|
SetImage(imageSource: Enum.ImageSource, imageId: integer) |
Sets the image source and ID. |
SetFillHorizontal(fillHorizontalType: Enum.ImageFillHorizontalType, fillAmount: number) |
Sets the fill type to Horizontal and sets the horizontal fill type and fill amount to the specified values. |
SetFillVertical(fillVerticalType: Enum.ImageFillVerticalType, fillAmount: number) |
Sets the fill type to Vertical and sets the vertical fill type and fill amount to the specified values. |
SetFillRadial90(fillRadial90Type: Enum.ImageFillRadial90Type, fillAmount: number) |
Sets the fill type to Radial90 and sets the radial 90 fill type and fill amount to the specified values. |
SetFillRadial180(fillRadialType: Enum.ImageFillRadialType, fillAmount: number) |
Sets the fill type to Radial180 and sets the radial fill type and fill amount to the specified values. |
SetFillRadial360(fillRadialType: Enum.ImageFillRadialType, fillAmount: number) |
Sets the fill type to Radial360 and sets the radial fill type and fill amount to the specified values. |
ClientUIPresetButtonControl is the type that represents an instance of a PresetButton component, allowing you to register cursor event listeners.
¶ Notable ClientUIPresetButtonControl Fields
| Field | Type | Description | Access |
|---|---|---|---|
interactable |
Boolean | Whether the Preset Button responds to user input and triggers events. | Read/Write |
clickAudioId |
Number | The ID of the sound effect to play when the button is clicked. | Read/Write |
raycastTarget |
Boolean | Whether the Preset Button can receive cursor interaction events. | Read/Write |
¶ Notable ClientUIPresetButtonControl Functions
| Field | Description |
|---|---|
AddCursorEventListener(eventType: Enum.CursorEventType, callback: function(eventData: CursorEventData) -> nil) |
Registers a cursor event listener to the Client Control. |
RemoveCursorEventListener(eventType: Enum.CursorEventType, callback: function(eventData: CursorEventData) -> nil) |
Removes the specified cursor event listener from the Client Control. |
SimulateCursorClick() |
Simulates the CursorDown, CursorUp, and CursorClick events in sequence. |
ClientUITextBoxControl is the type that represents an instance of a TextBoxControl component. Fields shared with the ClientUITextWindowControl type function identically.
¶ Notable ClientUITextBoxControl Fields
| Field | Type | Description | Access |
|---|---|---|---|
text |
String | The displayed text. | Read/Write |
fontSize |
Number | The default font size for all text in the text box. | Read/Write/Tweenable |
fontColor |
ColorValue | The default font color for all text in the text box. | Read/Write/Tweenable |
bgColor |
ColorValue | The background color of the text box. | Read/Write/Tweenable |
Tween is a type that, when created, allows you to modify the tweenable fields of a specified Client Control over time. Tweens can be used to create animations, execute code after a delay, or execute code at a set interval.
Functions from Tween should be called using colon notation.
¶ Creating a Tween
Use game.Tween(object: ClientUIBaseControl, properties: table, duration: number), where properties is a table containing values for fields which are tweenable on the target Client Control, object.
¶ Notable Tween Functions
| Function | Description |
|---|---|
SetEase(ease: Enum.EaseType) |
Sets the easing type of the Tween. |
SetLoops(loops: number) |
Sets the number of times the Tween will loop before completing. A negative value will loop infinitely. |
SetRelative(relative: boolean) |
Sets whether the Tween's properties apply relatively (added to current values), rather than setting them. |
SetOnComplete(callback: function()) |
Executes the specified function when the Tween is completed. |
SetOnStepComplete(callback: function()) |
Executes the specified function when the Tween loops. |
Kill(complete: boolean) |
Deletes the Tween instance, triggering the On Complete callback if true. It's good practice to call this function when the Tween completes! |
Play() |
Plays the Tween. |
Pause() |
Pauses playback of the Tween. |
Resume() |
Resumes playback of the Tween. |
Restart() |
Returns the Tween to the initial state. |
¶ Example
-- Creates a tween which modifies the anchorPositionX of the Client Control that the script is attached to by 100 over 3 seconds
local myTween = game.Tween(script.object, {
  anchoredPositionX = 100
}, 3)

myTween:SetOnStepComplete(function()
  print("Moved 100 units to the right!")
end)

myTween:SetOnComplete(function()
  print("Tween complete!")
  myTween:Kill(false) -- Remember to kill your tweens if they are only used once, otherwise they may gradually accumulate in memory and slow down your stage!
end)

-- Causes the Tween's transformations to apply relatively (additively to current values), rather than setting them.
-- If not set/false (default), the Tween would move the Client Control to x=100 on the canvas.
myTween:SetRelative(true)

myTween:SetLoops(2)

myTween:Play()
Output
- Visually, the Client Control that the script is attached to would move 200 units from it's initial location on the canvas when the stage starts.
Moved 100 units to the right!
(3s delay)
Moved 100 units to the right!
Tween complete!
TweenSequence is a type that, when created, allows you to sequence multiple Tweens in a timeline-like format.
Functions from TweenSequence should be called using colon notation.
¶ Creating a TweenSequence
Use game.TweenSequence() to create a TweenSequence.
¶ Notable TweenSequence Functions
| Function | Description |
|---|---|
Append(tween: Tween) |
Appends tween to the end of the sequence. |
AppendCallback(callback: function()) |
Appends a function call to the end of the sequence. |
AppendInterval(duration: number) |
Appends a wait interval, in seconds, to the end of the sequence. |
Insert(time: number, tween: Tween) |
Inserts tween at the specified timeline time. |
Kill(complete: boolean) |
Deletes the TweenSequence Instance, triggering the On Complete callback if true. It's good practice to call this function when the sequence completes! |
SetLoops(loops: number) |
Sets the number of times the sequence will loop before completing. A negative number will loop infinitely. |
SetOnComplete(callback: function()) |
Executes the specified function when the sequence completes. |
SetOnStepComplete(callback: function()) |
Executes the specified function when thte sequence loops. |
Play() |
Plays the sequence. |
Pause() |
Pauses playback of the sequence. |
Resume() |
Resumes playback of the sequence. |
Restart() |
Returns the sequence to the initial state. |
¶ Example
local sequence = game.TweenSequence()

local firstTween = game.Tween(script.object, {
  anchoredPositionX = 100
}, 3)
firstTween:SetRelative(true)
firstTween:SetOnComplete(function()
  print("First tween completed!")
end)

local secondTween = game.Tween(script.object, {
  localRotationZ = 360
}, 1)
secondTween:SetRelative(true)
secondTween:SetOnComplete(function()
  print("Second tween completed!")
end)

sequence:Append(firstTween)
sequence:Append(secondTween)
sequence:AppendInterval(3)

sequence:SetOnComplete(function()
  print("Tween sequence completed!")
  sequence:Kill(false) -- Remember to kill your tween sequences if they are only used once, otherwise they may gradually accumulate in memory and slow down your stage!
end)

sequence:Play()
Output
- Visually, the Client Control that the script is attached to will move 100 units right from it's initial position and immediately spin 360 degrees on the z-axis.
First tween completed!
(1s delay)
Second tween completed!
(3s delay)
Tween sequence completed!
ServerSignal is a type that, when created, allows you to send signals to the server. Signals sent from Client Control components are treated as Server Signals sent by the Stage Entity.
Functions from ServerSignal should be called using colon notation.
¶ Client Scripted Signals vs. Server Signals
On Server Node Graphs, signals can be sent in two ways: using the Send Signal node, or using the Send Client Scripted Signal node. When a signal is sent using the Send Signal node, all entities with Server Node Graphs monitoring the corresponding signal will receive the event; scripts will not receive the event. Conversely, when a signal is sent using the Send Client Scripted Signal node, all scripts with handlers set for the corresponding signal on the Target Player will receieve the event; Node Graphs will not receive the event.
¶ Creating a ServerSignal
Use game.ServerSignal(signalName: string) to create a ServerSignal.
¶ Adding Parameters to a ServerSignal
The ServerSignal type contains functions for adding parameters to the signal instance; however, parameters are added by appending values in the order that they are defined in the Server Signal Explorer, rather than by mapping the paramter name to a value. If a parameter is added to a ServerSignal and does not match the signal definition in the Server Signal Explorer, the default value of the type will be returned when sent.
¶ Notable ServerSignal Functions
| Function | Description |
|---|---|
AddBool(value: boolean) |
Appends a Boolean to the ServerSignal. |
AddFloat(value: number) |
Appends a Floating Point Number to the ServerSignal. |
AddInt(value: number) |
Appends an Integer to the ServerSignal. |
AddString(value: string) |
Appends a String to the ServerSignal. |
AddEntity(value: number) |
Appends an Entity to the ServerSignal by ID. |
AddPrefabId(value: number) |
Appends a Prefab ID to the ServerSignal. |
SendSignal() |
Sends the signal. |
¶ Example
Consider the following signal:
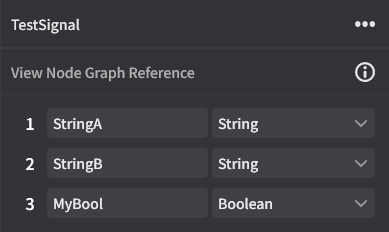
To send that signal from a script, you must add parameters in the defined order:
local signal = game.ServerSignal("TestSignal")
local familyName = "Naganohara"
local name = "Yoimiya"

signal:AddString("Hello")
signal:AddString(familyName .. " " .. name)
signal:AddBool(true)

signal:SendSignal()
A Node Graph that monitors TestSignal and prints the three parameters would output the following to the log:
Hello
Naganohara Yoimiya
true
Enums are constant values used by functions to pass an option from a preset list of options. Enums are defined in a global table called Enum, where each field contains multiple options for the relevant option. The MiliLua API Definitions VS Code extension has built-in API documentation which contains a complete list of enums.
¶ Example
Enum.EaseType.InBack
Enum.EaseType.InOutCirc
Enum.KeyEventType.KeyboardCharacterSkill1KeyUp
Enum.Device.MobileController
Enum.ImageSource.Prefab
Scroll back to Miliastra-specific Lua Features
Don't forget to read (or skim) through each section!
¶ Helpful Resources
Not all of the following resources are created by me (haminpants), but may still be useful for developing Lua scripts!
¶ MiliLua
The source Lua definitions provided by the MiliLua API Definitions VS Code extension.
Originally documented by haminpants.
¶ MiliLua Documentation
Documentation generated from the Lua definitions from the MiliLua repo.
Maintained by haminpants.
¶ Ease Lab
A user-friendly visualizer for all the available easings supported by Tweens with settings for visualizing position, scale, and rotation in custom sequences.
Created by Kyvern.
¶ What's Next
Thank you for making it to the end of the guide! If you have feedback or questions, feel free to ping me (haminpants) in the Genshin Impact Creator Front Discord server!
¶ Footnotes
- Unless annoted with a footnote reference, all content is written by haminpants.
- This guide was written without the use of generative AI.